Table of Contents
Android DVB
Overview
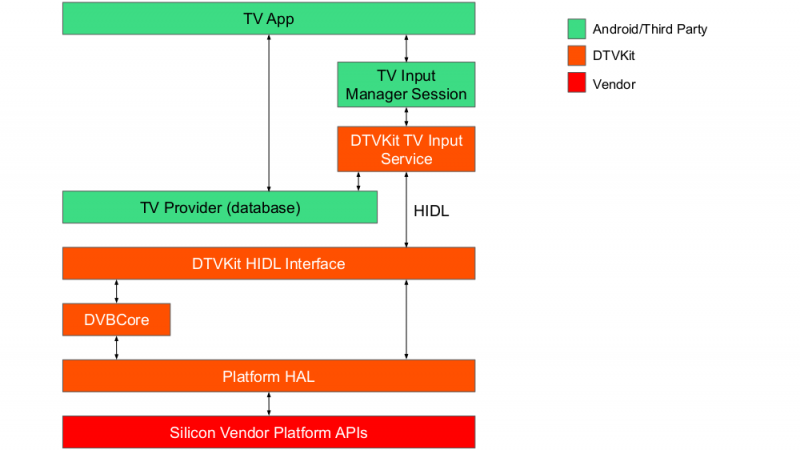
The DTVKit Android solution integrates DVBCore with Android using the Android TV Input Framework (TIF). By using the TIF, manufacturers can provide a TV input source that new and existing apps, such as Live Channels, can use through a standard Android API.
DTVKit Android Architecture
DVBCore is integrated with the Android TIF using a HIDL interface to ensure that it complies with the ‘Treble’ architecture introduced by Google in Android ‘P’.
HIDL Interface
The HIDL interface enables the TV Input Service to communicate with and control the DVB stack by providing a glue code interface. The glue code is separated into a number of different interfaces that each have a number of invokable methods (methods the client can call remotely, for which it receives an accepted or rejected response) and signals (one-way messages to the client). The glue interfaces provided are:
- Dvb – get frontend statuses, get service and event lists, manage service lists, manage parental control
- Dvbt – terrestrial service search
- Dvbs – satellite service search
- Dvbc – cable service search
- Player – play content (e.g. live DVB) and manage playback (e.g. volume, audio and subtitle streams, audio and subtitle preferences)
Input Source
The input source is built as an Android system application. It provides:
- A TvInputService/TvInputService.Session implementation. Applications interact with this through the TvView abstraction to show programs provided by the input source.
- The set up activity. This is launched by the TV app (e.g. Live Channels) and provides a user-interface for doing a service search.
- The TV provider sync job. A background service that updates the TV provider database to match the channels and programs in the DVBCore database.
Companion Library
The TV input source uses parts of the companion library (Apache License 2.0), which can be found in the Android TV sample inputs project (the companion library is not used as a third-party library, but is copied into the project).
Our copy has a number of modifications. We have removed ads, XMLTV parsing, the template set up activity and the base TV input service (which has been replaced by our own implementation).
Building DTVKit Android
The repository can be cloned from Github and should ideally be placed in the vendor directory from the Android source tree.
Please note that where it states 'your-platform', this will need to be replaced with the target platform that you wish to use e.g. BroadcomPlatform
Build and installation
1. Clone the DTVKit Android components and overlay DVBCore and the DTVKit platform
cd $ANDROID_BUILD_TOP
git clone https://github.com/DTVKit/android vendor/dtvkit
git clone https://github.com/DTVKit/DVBCore vendor/dtvkit/DVBCore/DVBCore
git clone https://github.com/DTVKit/your-platform vendor/dtvkit/your-platform
2. Build DVBCore
mmm vendor/dtvkit/DVBCore
3. Build the DTVKit platform
mmm vendor/dtvkit/your-platform
4. Build the DTVKit service
mmm vendor/dtvkit/interfaces/dtvkit/1.0
mmm vendor/dtvkit/interfaces/dtvkit/1.0/default
5. Build the inputsource app
mmm vendor/dtvkit/apps/inputsource
6. Add the following to the device manifest
 <hal format="hidl">
     <name>vendor.dtvkit.hardware.dtvkit</name>
     <transport>hwbinder</transport>
     <version>1.0</version>
     <interface>
         <name>IDTVKit</name>
         <instance>default</instance>
     </interface>
 </hal>
7. Generate hashes using the hidl-gen command for the DTVKit HIDL interfaces and add them to the current.txt (or similar) for your device
hidl-gen -Lhash -rvendor.dtvkit.hardware:vendor/dtvkit/interfaces -randroid.hidl:system/libhidl/transport vendor.dtvkit.hardware.dtvkit@1.0
SELinux Configuration Android P
Android uses Security-Enhanced Linux (SELinux) to enforce mandatory access control (MAC) over all processes. SELinux operates in two modes:
- Permissive - SELinux security policy is not enforced, only logged
- Enforcing - SELinux security policy is enforced and logged
The DTVKit HAL service needs to be a in a SELinux domain for it to auto start.
Auto-start service in Permissive Mode
For non-production devices (e.g. development) SELinux can be disabled by setting it to permissive mode.
1. Create ~/device/[MANUFACTURER]/[DEVICE-NAME]/sepolicy/hal_dtvkit.te:
type hal_dtvkit, domain;
type hal_dtvkit_exec, exec_type, vendor_file_type, file_type;
hwbinder_use(hal_dtvkit);
init_daemon_domain(hal_dtvkit);
add_hwservice(hal_dtvkit, hal_dtvkit_hwservice)
2. Add to ~/device/[MANUFACTURER]/[DEVICE-NAME]/sepolicy/file_context:
/(vendor|system/vendor)/bin/hw/vendor\.dtvkit\.hardware\.dtvkit@1\.0-service
u:object_r:hal_dtvkit_exec:s0
3. Create ~/device/[MANUFACTURER]/[DEVICE-NAME]/sepolicy/hwservice.te:
type hal_dtvkit_hwservice, hwservice_manager_type;
4. Add ~/device/[MANUFACTURER]/[DEVICE-NAME]/sepolicy/hwservice_contexts:
vendor.dtvkit.hardware.dtvkit::IDTVKit
u:object_r:hal_dtvkit_hwservice:s0
Auto-start service in Enforcing mode
Policy rules need to be added in the policy files in order to grant access. We can use audit2allow tool in the Android source tree to generate policy statements by taking in dmesg and logcat denial logs.
adb shell su -c dmesg | grep denied | audit2allow -p
out/target/product/BOARD/root/sepolicy
The policy statements are only for hints and to help you write policy rules. Each policy rule should be checked to see if it is necessary to put into the policy file.
